

Owl Box Creation Guide
You will need:
- Wood
- Two 10”x18”x1” pieces (Side pieces)
- One 16.75”x7.75”x1” piece (Front piece)
- One 32”x7.75”x1” piece (Back piece)
- One 8.5”x7.75”x1” piece (Bottom piece)
- One 12”x11.25”x1” piece (Roof)
- Drill
- Hole Saw
- Tape Measure
- Pencil (for marking measurements)
- 24 2 – inch galvanized screws
- Screwdriver
- Saw
- 2 Brass hinges with screws
- Hook and eye latch
There are many types of wood that can work for this, including – but certainly not limited to – Redwood, Cedar, Pine, Oak, Beech, and many others. If you find some wood that you think would work well, make sure that it will last before you start building.
Step 1
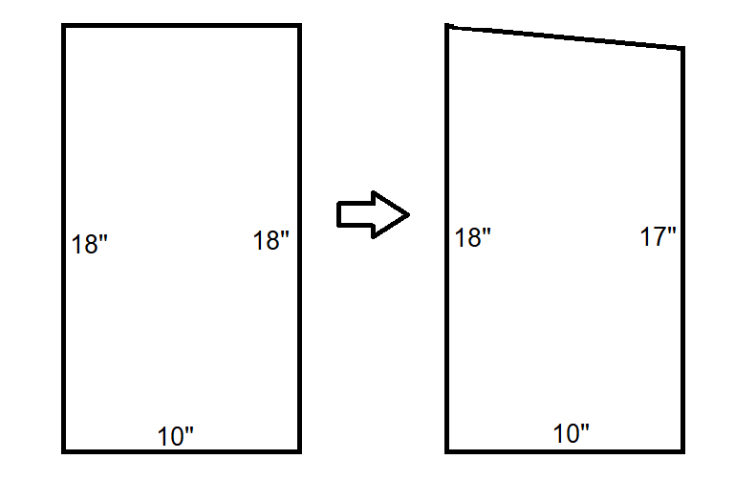
Take each of the side pieces, and cut them from the top using the saw so that one side is 1 inch shorter than the other like so.
This slant exists so that rainwater and other things can slide off the roof more easily.
Step 2
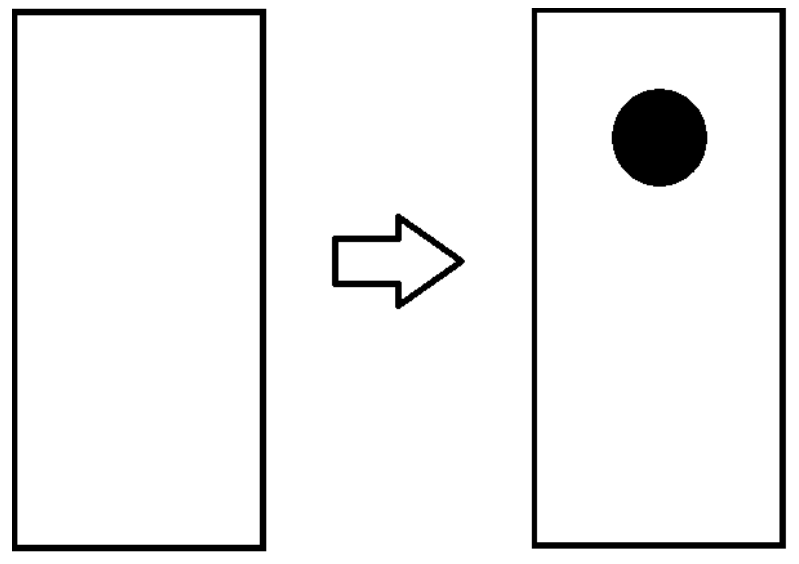
Using a hole saw, cut a 3 inches in diameter entrance hole on the front piece. This hole should be 4 inches from the top of the piece.
Step 3
Measure 7 inches from the bottom of the back piece. This is where the bottoms of the side pieces will go. Screw each side piece to the left and right edge of the back piece using three screws. The tops of the side pieces should slope toward the front.
The Blue dashes indicate where the screws should be. The measurements for the screws do not need to be exact, just so long as they are spread far apart and evenly.
Screw the right side on in the same manner.
Step 4
Measure ½ inch from the bottom of the side piece. This is where the bottom piece will go. Screw the bottom piece in between using three screws on each side.
Step 5
Screw the front piece in place so that it is even with the side pieces. Use three screws on each side and on the bottom.
Step 6
Using the two brass hinges, attach the top piece to the back of the box like so. The top piece should be able to freely open and close.
Step 7
You’re almost done!
The last thing you need to do is attach a latch to the roof so that it can be secured closed. There are many ways to do this, but the most efficient way of doing so would be to attach a fisheye hook to the roof and side of the box so that it can be secured shut.
Congratulations! Now you have a completed owl box that can be screwed onto a tree for owls to nest inside.
Your owl box should be hung between 10 and 15 feet off the ground, as that is where owls usually like to create their nests.
If you want to learn more about various aspects of nature and conservation, you can go to ceedli.org/programofferings/ to learn about many programs they offer here at CEED!

Anyone can volunteer. Even you!
